Integrating Airtable with Mendix

Introduction
Airtable provides a powerful REST API that lets you programmatically interact with your bases. Here’s a quick guide to get you up and running with curl commands.
Original article available here.
Setup
First, create a Personal Access Token at airtable.com/create/tokens. You’ll need these scopes:
data.records:read- Read record datadata.records:write- Create, edit, and delete recordsschema.bases:read- View base structurewebhook:manage- Manage webhooksuser.email:read- Access user email
Make sure to add access to all the bases you want to work with.
Core Operations
Create a Table
Use the Metadata API to create new tables with a defined schema:
BASE_ID=appXXX
TOKEN=patXXX
curl -X POST “https://api.airtable.com/v0/meta/bases/$BASE_ID/tables” \
  -H “Content-Type: application/json” \
  -H “Authorization: Bearer $TOKEN” \
  -d ‘{
    “name”: “My New Table”,
    “fields”: [
      {
        “name”: “Name”,
        “type”: “singleLineText”
      },
      {
        “name”: “Status”,
        “type”: “singleSelect”,
        “options”: {
          “choices”: [
            {”name”: “Todo”},
            {”name”: “In Progress”},
            {”name”: “Done”}
          ]
        }
      },
      {
        “name”: “Due Date”,
        “type”: “date”,
        “options”: {
          “dateFormat”: {”name”: “us”}
        }
      }
    ]
  }’
List Records
Retrieve all records from a table:
curl “https://api.airtable.com/v0/$BASE_ID/$TABLE_ID” \
  -H “Authorization: Bearer $TOKEN”
Get a Single Record
curl “https://api.airtable.com/v0/$BASE_ID/$TABLE_ID/$RECORD_ID” \
  -H “Authorization: Bearer $TOKEN”
Create Records
Create a single record:
curl “https://api.airtable.com/v0/$BASE_ID/$TABLE_ID” \
  -H “Content-Type: application/json” \
  -H “Authorization: Bearer $TOKEN” \
  --data ‘{
    “fields”: {
      “Name”: “Test 123”,
      “Synopsis”: “Some synopsis”
    }
  }’
Or create multiple records at once:
curl “https://api.airtable.com/v0/$BASE_ID/$TABLE_ID” \
  -H “Content-Type: application/json” \
  -H “Authorization: Bearer $TOKEN” \
  --data ‘{
    “records”: [
      {”fields”: {”Name”: “Test 123”, “Synopsis”: “Some synopsis”}},
      {”fields”: {”Name”: “Test 456”, “Synopsis”: “Another synopsis”}}
    ]
  }’
Update a Record
Use PATCH to update specific fields (other fields remain unchanged):
curl -X PATCH “https://api.airtable.com/v0/$BASE_ID/$TABLE_ID/$RECORD_ID” \
  -H “Content-Type: application/json” \
  -H “Authorization: Bearer $TOKEN” \
  --data ‘{
    “fields”: {
      “Name”: “Updated Name”,
      “Synopsis”: “Updated synopsis”
    }
  }’
Delete a Record
curl -X DELETE “https://api.airtable.com/v0/$BASE_ID/$TABLE_ID/$RECORD_ID” \
  -H “Authorization: Bearer $TOKEN”
Response: {"deleted": true, "id": "recXXX"}
Finding Your IDs
Your base and table IDs are visible in the Airtable URL:
airtable.com/appXXXXXXXXXXXXXX/tblXXXXXXXXXXXXXX/viwXXXXXXXXXXXXXX
             ↑                  ↑                  ↑
          BASE_ID            TABLE_ID           VIEW_ID
Base IDs start with
appTable IDs start with
tblRecord IDs start with
rec
Mendix
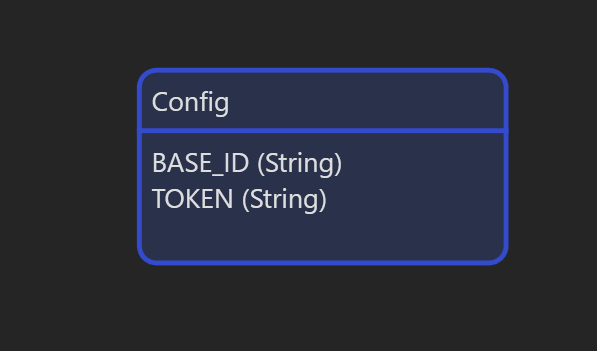
In Mendix we start off by setting a configuration entity with attributes for BASE_ID and TOKEN.
Next, we set up an overview page for listing the tables.
For that, first we need a JSON structure JSON_Response_Tables and use this in import mapping IM_List_Tables to map out the response. Use the automatic mapping feature to scaffold the relevant entities.
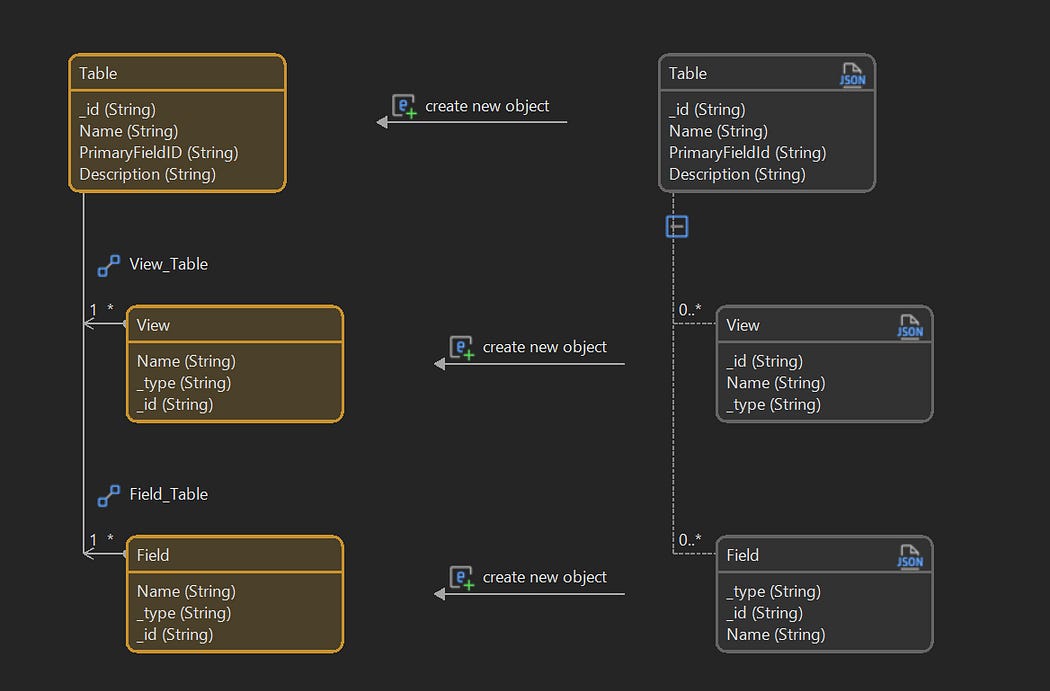
Tables Mapping
We use IM_LIST_TABLES in a microflow DS_TABLESto return the list of tables, which we can then use for the data source for the grid rendering the tables on the overview page.
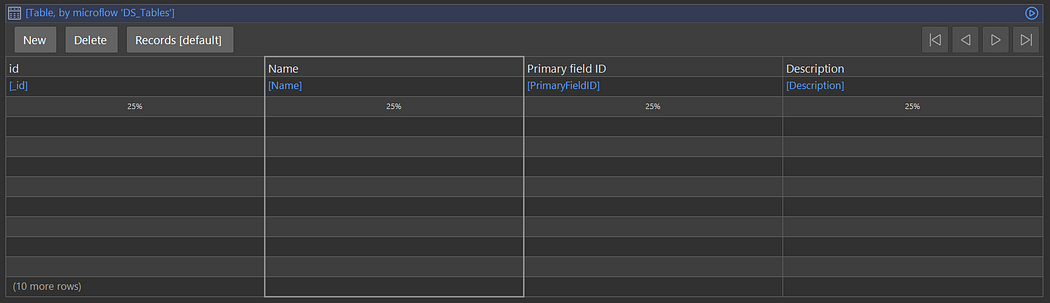
Tables Overview Page
In terms of mapping and domain entities, creating a new Airtable is cumbersome, so a simple page with a text area taking a JSON value can be created and added behind a “New” button on the main Airtable overview page.
Double-Clicking on a row on the Airtable overview page should take you to a page rendering the table records.
To do this, create a microflow that takes as argument the Airtable and uses its ID in https://api.airtable.com/v0/$BASE_ID/$TABLE_ID.
The response JSON from the above call does not map easily in Mendix due to dynamic keys. To deal with this in a general fashion, we convert {"k0":"v0",...} into [{"key":"k0","value":"v0"},...]. This also has to work for different value types, e.g. String, Boolean, DateTime, Object and Array, and set value to a stringified version the original value.
Create a Java Action Main.ParseTablesResponseJSON that is written specifically for the Airtable record list JSON response and converts as described above.
  // BEGIN USER CODE
  JSONObject input = new JSONObject(JsonString);
  JSONObject output = new JSONObject();
  JSONArray inputRecords = input.getJSONArray(”records”);
  JSONArray outputRecords = new JSONArray();
  for (int i = 0; i < inputRecords.length(); i++) {
   JSONObject record = inputRecords.getJSONObject(i);
   JSONObject transformedRecord = new JSONObject();
   transformedRecord.put(”id”, record.getString(”id”));
   transformedRecord.put(”createdTime”, record.getString(”createdTime”));
   JSONArray fieldsArray = new JSONArray();
   JSONObject fieldsObject = record.getJSONObject(”fields”);
   Iterator<String> keys = fieldsObject.keys();
   while (keys.hasNext()) {
    String key = keys.next();
    Object value = fieldsObject.get(key);
    JSONObject fieldEntry = new JSONObject();
    fieldEntry.put(”key”, key);
    if (value instanceof JSONArray) {
     fieldEntry.put(”value”, value.toString());
    } else if (value instanceof JSONObject) {
     fieldEntry.put(”value”, value.toString());
    } else if (value instanceof String) {
     fieldEntry.put(”value”, value);
    } else if (value instanceof Boolean) {
     fieldEntry.put(”value”, value);
    } else if (value instanceof Number) {
     Number num = (Number) value;
     if (value instanceof Integer || value instanceof Long) {
      fieldEntry.put(”value”, num);
     } else {
      fieldEntry.put(”value”, num.toString());
     }
    } else {
     fieldEntry.put(”value”, value.toString());
    }
    fieldsArray.put(fieldEntry);
   }
   transformedRecord.put(”fields”, fieldsArray);
   outputRecords.put(transformedRecord);
  }
  output.put(”records”, outputRecords);
  return output.toString();
  // END USER CODE
This transformed JSON can then be used for a JSON Structure JSON_RESPONSE_RECORDS which is used in import mapping IM_LIST_RECORDS.
Import Mapping for Records
With the above in place we can write JDS_RECORDS to call the Airtables API to get the records, modify the JSON response, and then map it to Mendix entities we can use on a records overview page.
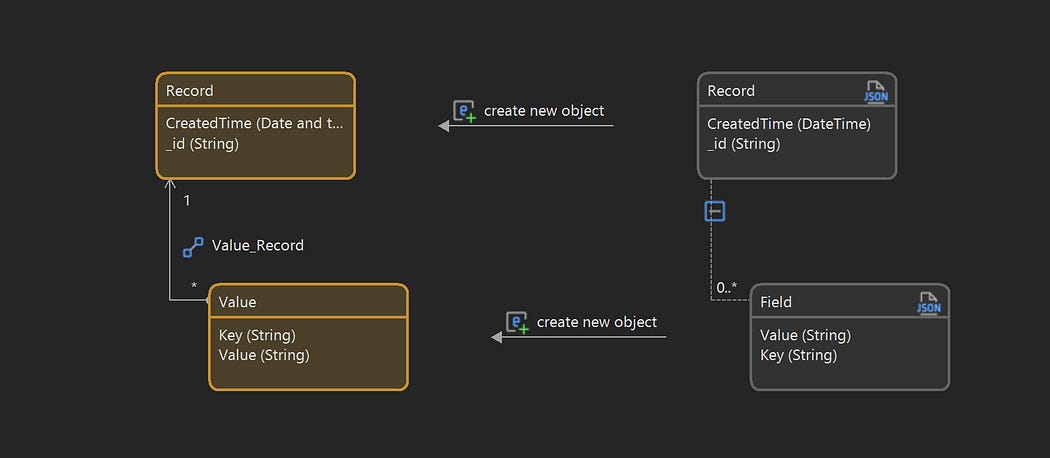
First, however, because of the structure of the data, we need to set up our own helper object to create a link between the Airtable Field description and the actual Record Value. This has to be done in order to properly render the mapped entities from the API call for getting the records.
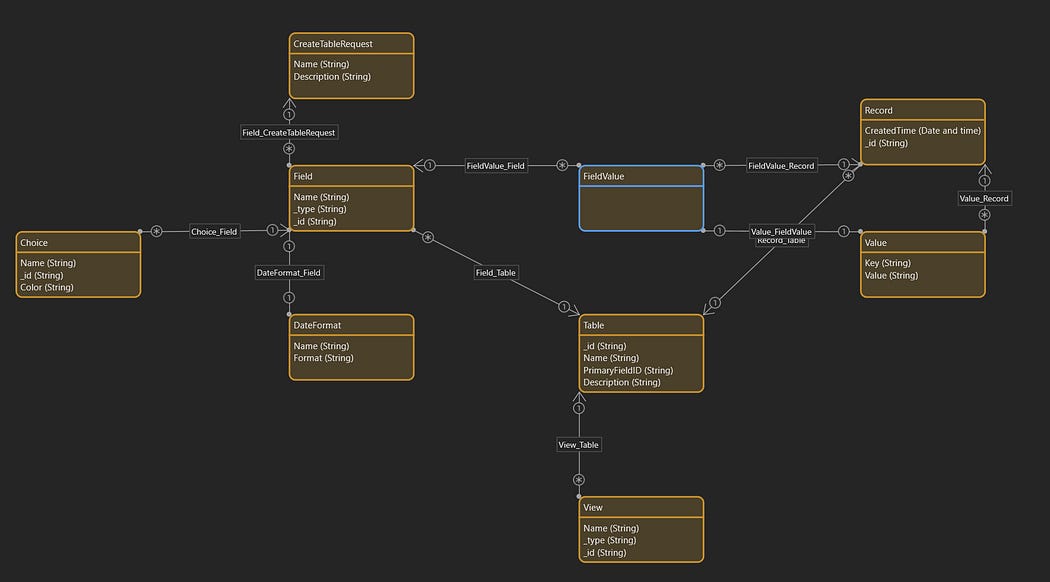
FieldValue Entity
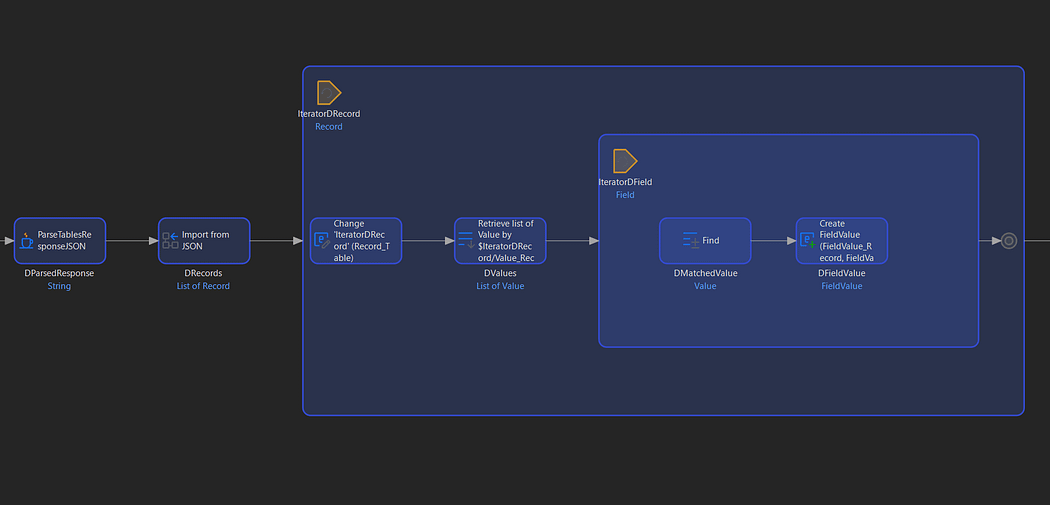
Extra Steps following after Service Call
Now we can create the Records page. With some minor CSS we can use List Views to render something that looks like an editable regular Mendix Data Grid.
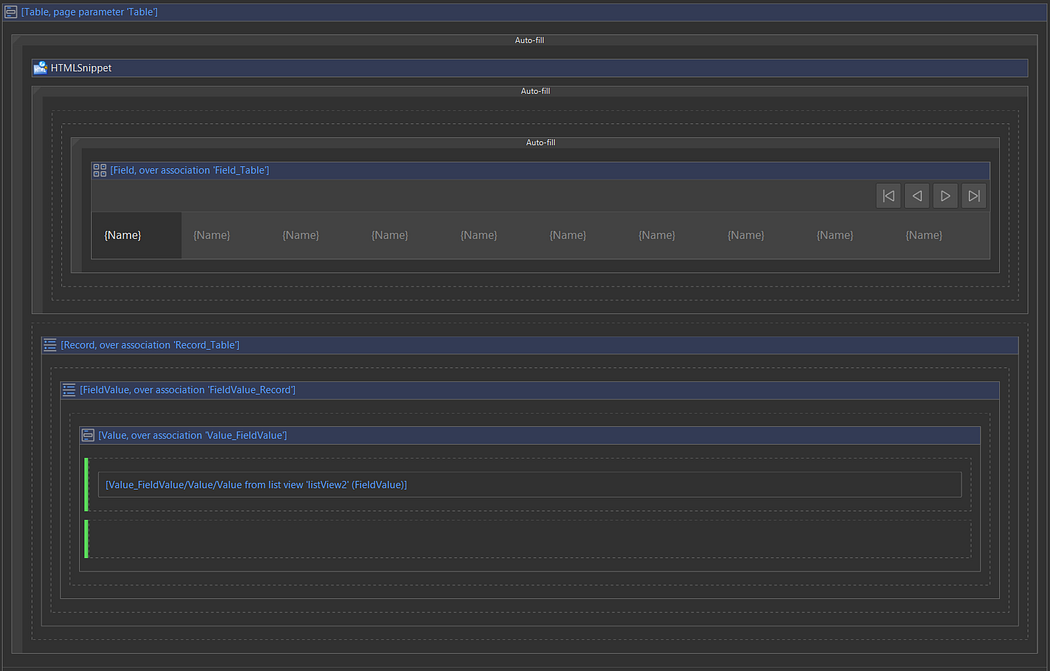
Table Details Page
Here we iterate over the Field instances assocated with the Table able to render the table headings and iterate over the Recordsinstances associated with the Table, and for each Record, we get the entity we created, FieldValue, from which we can then get the Value instances to render for the cells of the table. With this in place the cell order in every row will stay the same and in the case that a FieldValue has no cell data available, we can render an empty cell.
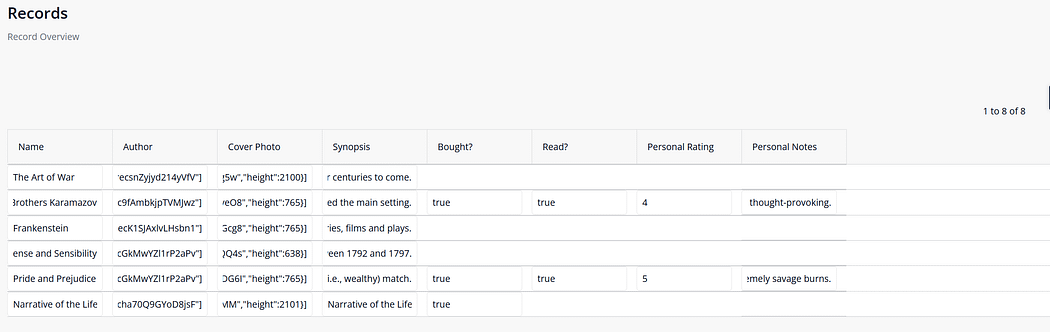
Rendered Details Page
Finally, we add an On change microflow to the Text Box that uses the Airtable API for updating a value.


Comments
Post a Comment