Integrating Mendix with n8n: Low-Code meets Low-Code

Introduction
n8n is a workflow automation tool that lets you connect apps and automate tasks. Here we will look at the self-hosted version of n8n and leverage its workflow API. In this guide, we’ll set up n8n locally, explore its API capabilities, and integrate it with Mendix. Original article here.
Prerequisites
Node.js installed (version 18 or higher)
An HTTP client like curl
n8n Installation
npm install n8n -gFor more installation options, see the official documentation.
Launch n8n with a simple command:
n8nThe server will start and be accessible at
http://localhost:5678
. Keep this terminal window open while working with n8n.
Generate an n8n API Key
To use the API you need to generate an API key.
Open your browser and navigate to
http://localhost:5678
Complete the initial setup if this is your first time
Go to Settings > n8n API
Click Create an API key
Copy the generated key — you’ll need it for all API calls
API Basics
All n8n API calls follow this pattern:
curl ‘http://localhost:5678/api/v1/<endpoint>’ \
--header ‘Accept: application/json’ \
--header ‘X-N8N-API-KEY: YOUR_SECRET_TOKEN’
Replace <endpoint> with the specific resource (e.g., workflows, users) and YOUR_SECRET_TOKEN with your API key.
For the full API reference, visit the n8n API documentation.
Listing All Users
curl ‘http://localhost:5678/api/v1/users’ \
--header ‘Accept: application/json’ \
--header ‘X-N8N-API-KEY: YOUR_SECRET_TOKEN’
Getting Specific User Details
curl ‘http://localhost:5678/api/v1/users/{id}’ \
--header ‘Accept: application/json’ \
--header ‘X-N8N-API-KEY: YOUR_SECRET_TOKEN’
Replace {id} with the user’s ID from the list users response.
Listing All Workflows
curl ‘http://localhost:5678/api/v1/workflows’ \
--header ‘Accept: application/json’ \
--header ‘X-N8N-API-KEY: YOUR_SECRET_TOKEN’
This returns all workflows in your n8n instance with their IDs, names, and status.
Getting Specific Workflow
curl -H “X-N8N-API-KEY: YOUR_API_KEY” \
“http://localhost:5678/api/v1/workflows/{id}”
Replace {id} with the workflow ID to retrieve its complete definition, including nodes and connections.
Creating an Empty Workflow
curl -X POST “http://localhost:5678/api/v1/workflows” \
     -H “X-N8N-API-KEY: YOUR_API_KEY” \
     -H “Content-Type: application/json” \
     -d ‘{
          “name”: “My New Workflow”,
          “nodes”: [],
          “connections”: {},
          “settings”: {}
         }’
This creates a basic workflow with no nodes. You can then add nodes via the UI or subsequent API calls.
Creating a Webhook-Triggered Workflow
Here’s a more practical example — a workflow that can be triggered via HTTP webhook:
curl -X POST “http://localhost:5678/api/v1/workflows” \
     -H “X-N8N-API-KEY: YOUR_API_KEY” \
     -H “Content-Type: application/json” \
     -d ‘{
          “name”: “apiA”,
          “nodes”: [
            {
              “parameters”: {
                “path”: “testA”,
                “options”: {}
              },
              “id”: “ae3872c0-826d-4952-9786-905a38a7c290”,
              “name”: “Webhook”,
              “type”: “n8n-nodes-base.webhook”,
              “typeVersion”: 1,
              “position”: [250, 300],
              “webhookId”:”a692e179-b77e-4bf7-8a95-e7363f16ad1a”
            }
          ],
          “connections”: {},
          “settings”: {
            “executionOrder”: “v1”,
            “callerPolicy”: “workflowsFromSameOwner”,
            “availableInMCP”: false
          }
         }’
This creates a workflow with a single webhook node listening on the path /testA.
Activating a Workflow
Workflows must be activated before they can execute:
curl -X POST “http://localhost:5678/api/v1/workflows/{id}/activate” \
     -H “X-N8N-API-KEY: YOUR_API_KEY”
Deactivating a Workflow
To stop a workflow from executing:
curl -X POST “http://localhost:5678/api/v1/workflows/{id}/deactivate” \
     -H “X-N8N-API-KEY: YOUR_API_KEY”
Triggering a Workflow
Once activated, trigger your webhook workflow:
curl -X POST ‘http://localhost:5678/webhook/testA’ \
--header ‘Content-Type: application/json’ \
--data ‘{”somekey”: “somevalue”}’
Note that webhook calls don’t require the API key — they use the webhook path you defined.
Deleting a Workflow
Remove a workflow permanently:
curl -X DELETE “http://localhost:5678/api/v1/workflows/{id}” \
     -H “X-N8N-API-KEY: YOUR_API_KEY”
Warning: This action is irreversible. Make sure you’ve exported any workflows you want to keep.
Integrating Mendix with n8n
Now that we understand the n8n API, let’s integrate it with Mendix.
Create a new module called n8n in your Mendix project. This will contain all entities, microflows, and pages for the integration.
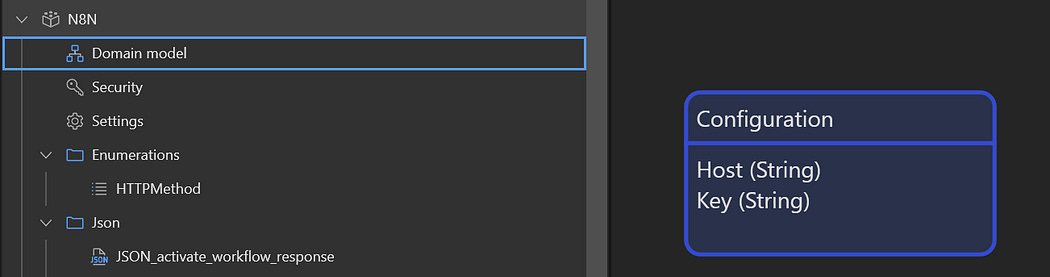
Setting up a Configuration Entity
Next, create a Configuration entity with the following attributes:
Host(String) - e.g.,
http://localhost:5678
Key(String) - your n8n API key
Create a microflow DS_Configuration that retrieves the configuration singleton. This will be used as the data source for configuration management.
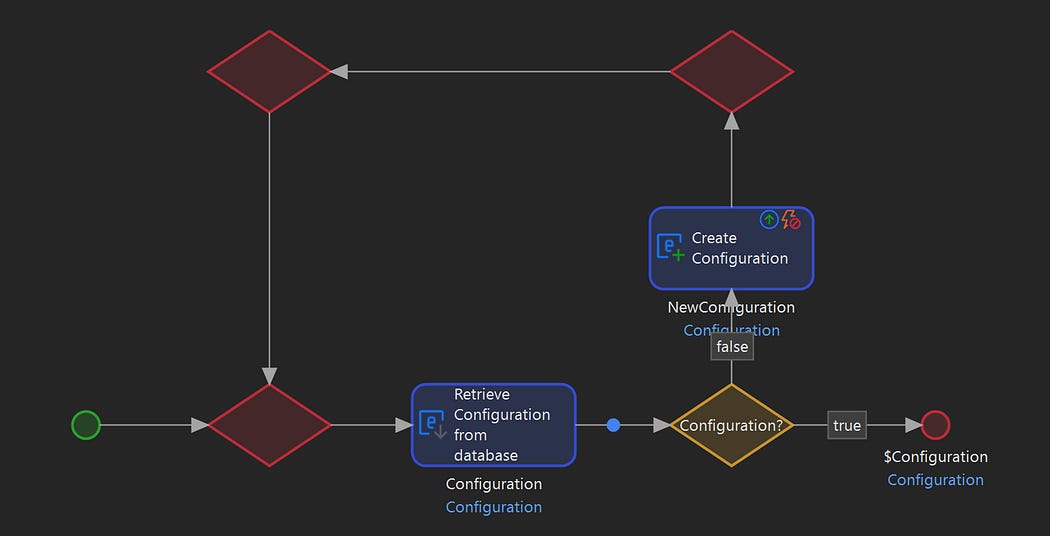
Configuration Retrieval
Create a Configuration edit page with a data view that uses the DS_Configuration microflow. This allows you to manage your n8n connection settings through the Mendix UI.
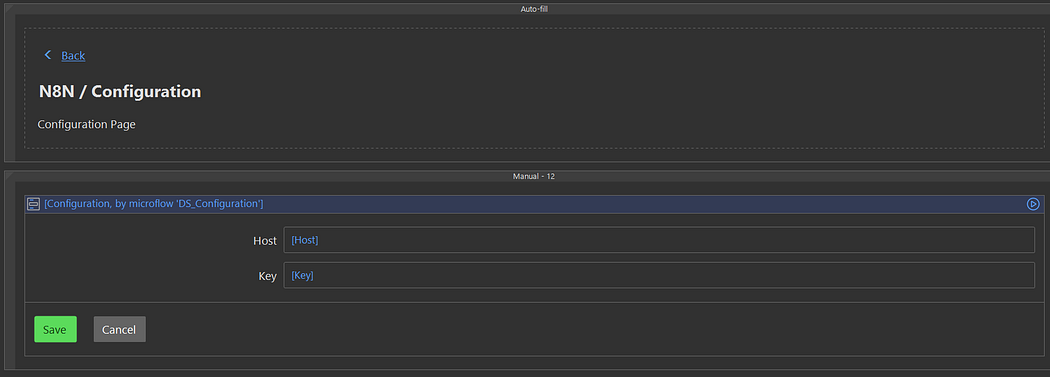
Configuration Page
Importing Workflows from n8n
Create a JSON structure and import mapping called IM_Workflows using the JSON structure. Use Mendix’s automatic mapping feature to generate the workflow entity structure.
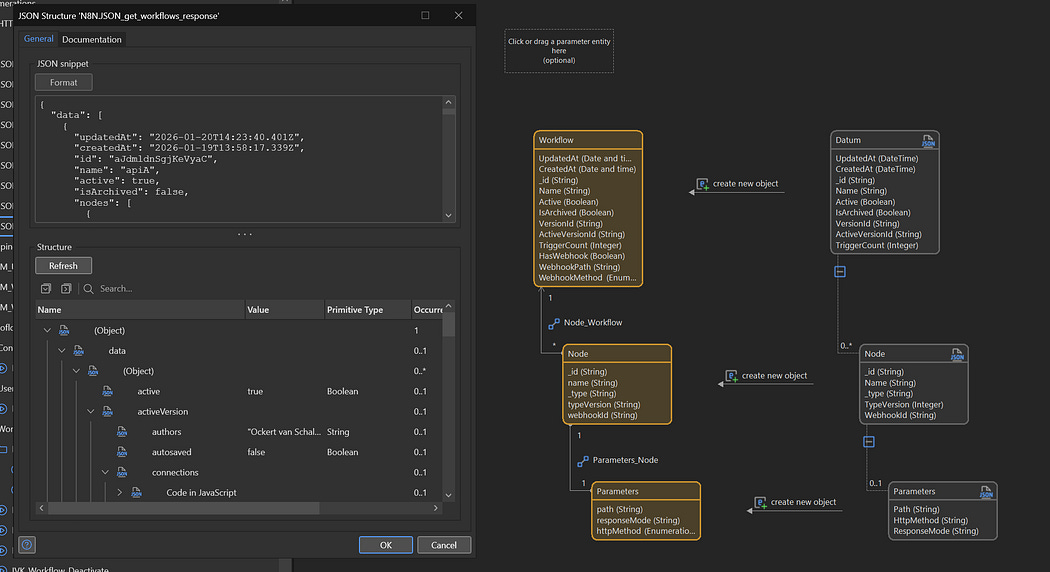
Import Mapping
Review and rename the generated entities as needed. Also add the following attributes that will be used later on:
HasWebhook(Boolean)WebhookPath(String)WebhookMethod(String)
Next create a Microflow microflow DS_Workflows that does the following:
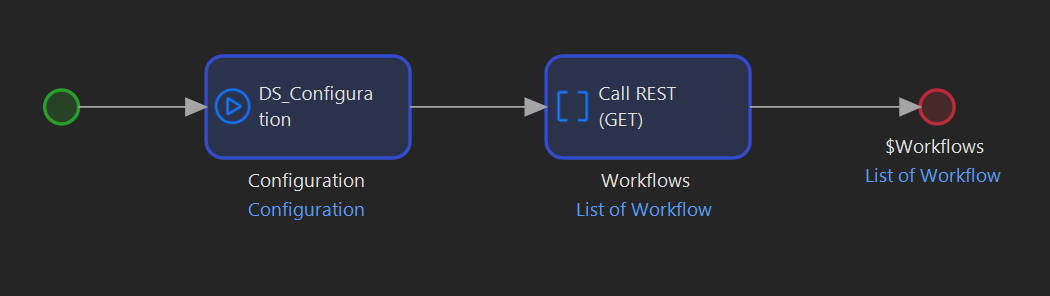
Getting the Workflows
Retrieves the configuration
Calls the n8n
api/v1/workflowsendpoint using the REST serviceMaps the response using your import mapping
Returns the list of Workflow entities
Now we can create a page with a data grid that uses DS_Workflows as its data source, displaying all workflows from n8n.
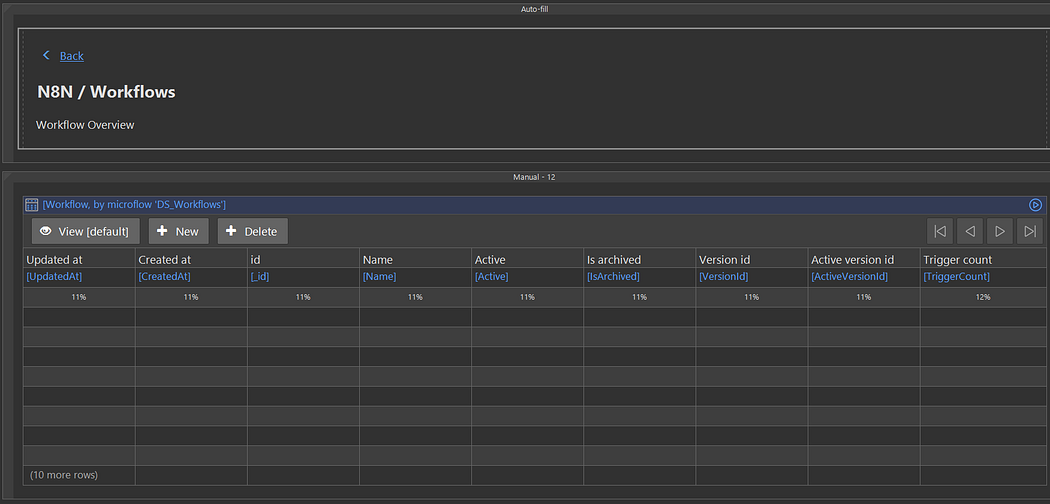
Workflow Overview Page
Detecting Webhook-Enabled Workflows
Not all n8n workflows can be triggered via webhook. We need to identify which workflows have webhook nodes configured.
We can extend the microflow to iterate through each workflow’s nodes and check if any node has type set to 'n8n-nodes-base.webhook'.
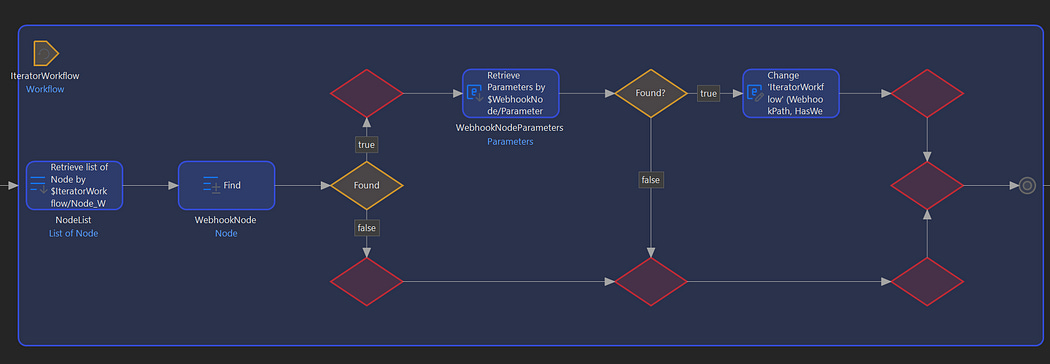
Checking for webhooks
For webhook nodes, extract:
parameters/path:store in attributeWebhookPathparameters/httpMethod:store in attributeWebhookMethod(defaults to GET if not specified)
Set the HasWebhook boolean to true if a webhook node is found.
This allows your UI to conditionally show webhook invocation options only for applicable workflows.
Create a Workflow Detail page and add a section for invoking the webhook that is conditionally visible based on HasWebhook
Webhook Section on Detail Page
For invocation we have a WebhookCall entity where the body can be set up.
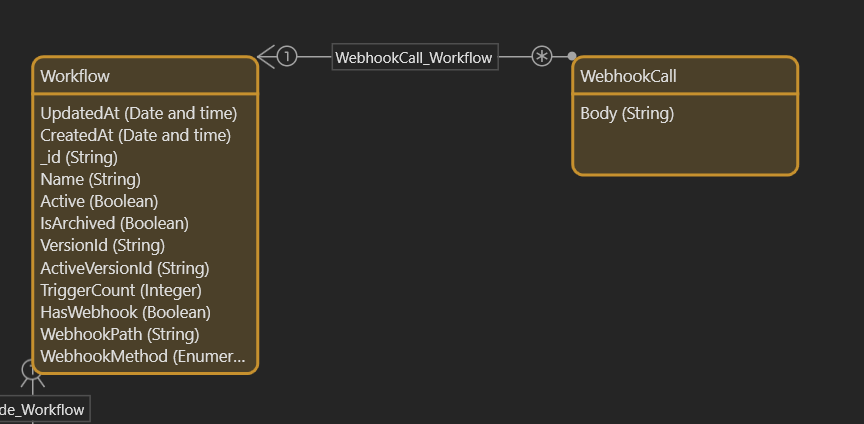
For invocation we can create the WebhookCall entity for the Workflow entity and show a page where the user can edit the payload.
Webhook Call Configuration Page
The Invoke button runs a microflow that gets the associated Workflow and checks it’s method to perform the correct HTTP method:
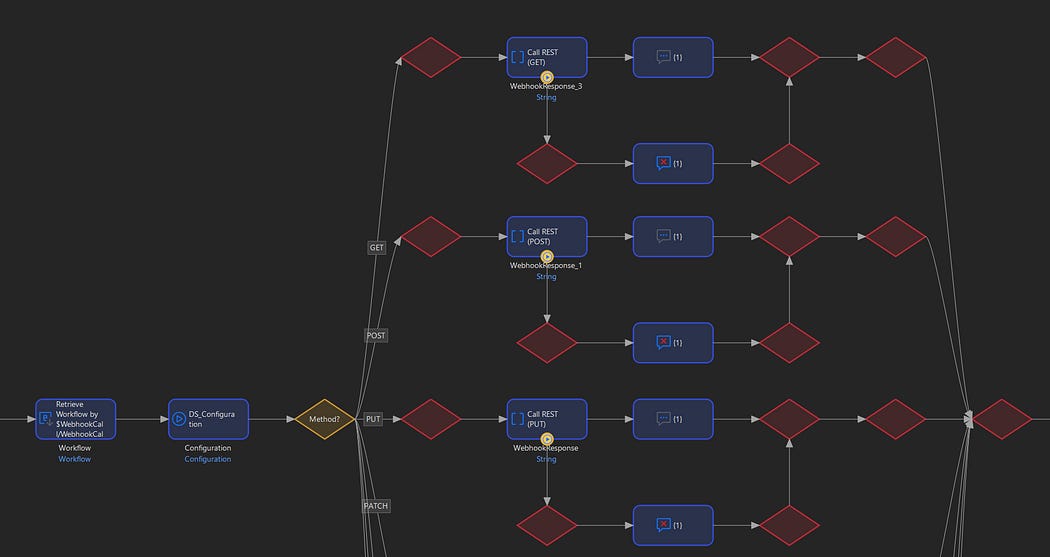
Invocation Microflow


Comments
Post a Comment