SAP CAP Websockets

Introduction
Modern applications need real-time updates — dashboards that update instantly, notifications that appear immediately, live data that flows without refreshing, and so on. Here we look at using WebSockets in CAP using @cap-js-community/websocket .
Original article available here.
Project Setup
Create a new CAP project and install dependencies:
cds init file-integration
cd file-integration
npm add @cap-js-community/websocket
npm install
Edit package.json to use sqlite:
{
  ...
  “cds”: {
    “requires”: {
      “db”: {
        “kind”: “sqlite”,
        “credentials”: {
          “database”: “db.sqlite”
        }
      }
    }
  }
}
Database
We set up a test entity first. Start by editing db/schema.cds as follows:
namespace com.test;
using { managed } from ‘@sap/cds/common’;
entity Data : managed {
  key ID : UUID;
  value : String(100);
  count : Integer;
}
We expose the entity as a service by editing srv/test-service.cds :
using { com.test as db } from ‘../db/schema’;
service TestService{
    entity Data as projection on db.Data;
}
Implementation
Create a new servicesrv/chat-service.cds with a function to send messages and events for messaging from client and a notifying from the server:
@protocol: ‘websocket’
service ChatService {
  function message(text: String) returns String;
  event clientMessage {
    type: String;
    sender: String;
    text: String;
    timestamp: DateTime;
  }
  event serverNotification {
    type: String;
    action: String;
    entity: String;
    data: {
      id: String;
      value: String;
      count: Integer;
    };
    timestamp: DateTime;
  }
}
Next, implement this service in srv/chat-service.js:
module.exports = (srv) => {
  srv.on(”message”, async (req) => {
    const clientMessage = req.data.text;
    return `Message received: ${clientMessage}`;
  });
  srv.on(”sendSystemMessage”, async (req) => {
    await srv.emit(”systemMessage”, {
      type: ‘system’,
      level: ‘info’,
      text: req.data.text,
      timestamp: new Date().toISOString()
    });
    return “System message sent”;
  });
};
To differentiate between messages from the WebSocket client to the CAP server and messages from the CAP server to WebSocket clients, we set up two handlers, srv.on("message",...) for messages from the client and srv.on("sendSystemMessage",...) for messages from the server.
Next implement srv/test-service.js as follows:
const cds = require(’@sap/cds’);
const LOG = cds.log(”test”);module.exports = async function() {
const { Data } = this.entities;
/**
* After CREATE - Send server notification
*/
this.after(’CREATE’, Data, async (data, req) => {
try {
const chatService = await cds.connect.to(’ChatService’);
// Emit as SERVER notification (not client message)
await chatService.emit(’serverNotification’, {
type: ‘server’,
action: ‘created’,
entity: ‘Data’,
data: {
id: data.ID,
value: data.value,
count: data.count
},
timestamp: new Date().toISOString()
});
} catch (error) {
LOG.error(’Failed to send notification:’, error);
}
});
/**
* After UPDATE - Send server notification
*/
this.after(’UPDATE’, Data, async (data, req) => {
LOG.info(’Data updated:’, data.ID);
try {
const chatService = await cds.connect.to(’ChatService’);
const updated = await SELECT.one.from(Data).where({ ID: data.ID });
await chatService.emit(’serverNotification’, {
type: ‘server’,
action: ‘updated’,
entity: ‘Data’,
data: {
id: updated.ID,
value: updated.value,
count: updated.count
},
timestamp: new Date().toISOString()
});
LOG.info(’ƒôñ Server notification sent’);
} catch (error) {
LOG.error(’Failed to send notification:’, error);
}
});
/**
* After DELETE - Send server notification
*/
this.after(’DELETE’, Data, async (data, req) => {
LOG.info(’Data deleted:’, data.ID);
try {
const chatService = await cds.connect.to(’ChatService’);
await chatService.emit(’serverNotification’, {
type: ‘server’,
action: ‘deleted’,
entity: ‘Data’,
data: {
id: data.ID,
value: null,
count: null
},
timestamp: new Date().toISOString()
});
} catch (error) {
LOG.error(’Failed to send notification:’, error);
}
});
};Here we get the chat service using cds.connect.to('ChatService') and emit a serverNotification events, which will be picked up by connected WebSocket clients.
At this point you can deploy and run using the following
cds deploy
npm run start
Testing
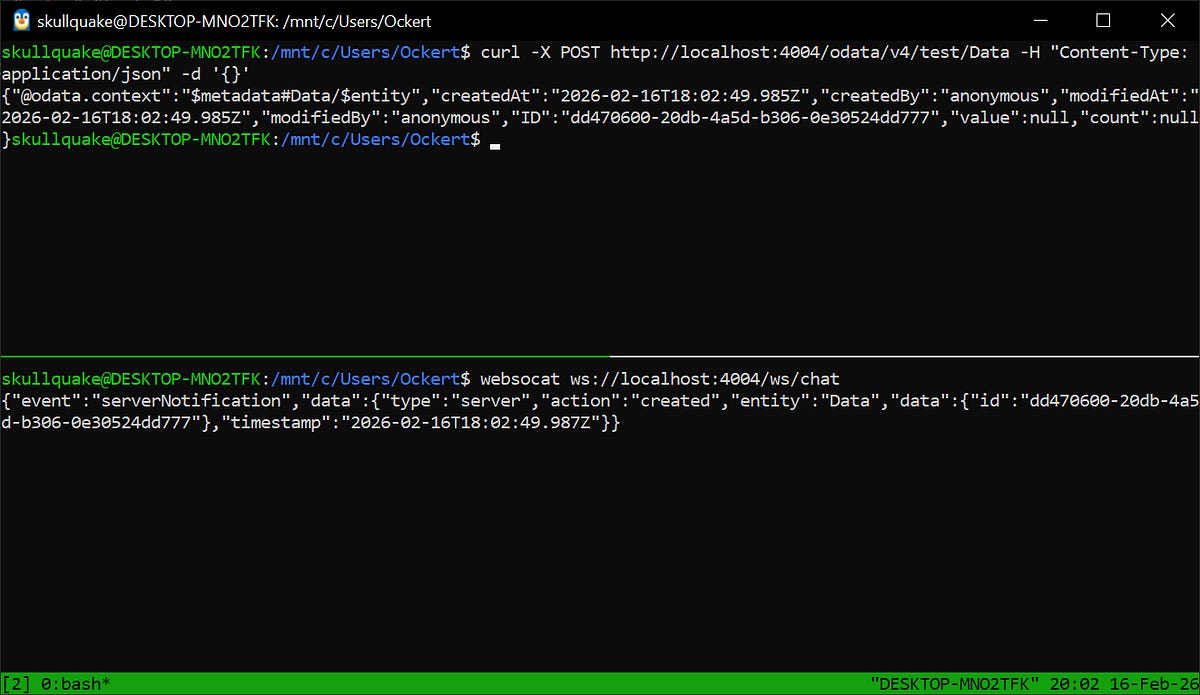
Now, to test all of this, you can use websocat , which you can install as follows:
apt-get install websocatYou can connect to the CAP server using websocat as follows
websocat ws://localhost:4004/ws/chatNote that the last path of the WebSocket path is chat , and this is based on the first part of the service name.
To test the WebSocket messaging, connect the WebSocket client, perform an OData create operation for the entity, and monitor the WebSocket client logs.


Comments
Post a Comment